Saturday, January 31, 2009

Super Bowl.. Chili


Do you realize that millions of people around the world will be tuning in for the 'Big Game' this weekend? And, there will be many holding the 'big party' as well. As a matter of fact this is the second largest snack day of the year. Second only to New Year. Super Bowl Sunday is the time to break out the snacks and enjoy the biggest football game of the year. Sure you can try to burn some of those extra calories cheering hard for your fave team, but that won't cut it if you plan to load your plate up with fried potato skins and cheesy processed dips, followed by what else? Oh yeah! Can after can of beer.

Imagine the U.S. Council for Calorie Control estimates that Americans will pack away 11 million pounds of artery filling potato chips before the clock runs out! Whoa!

Instead, why not try adding some of my Super Bowl chili to your snack menu! Whatever the game outcome--a great bowl of chili can keep you happy and healthier. It's easy to prepare, and always a crowd pleaser.

You might also look at Super Bowl Party Recipes for Cutting the Fat and Keeping the Flavors on the Councils site or hop on over to the newest Cooking Light where they have some 'super' light appetizers and snack recipes just itching for you to prepare.


So sit down, snack healthy and tune in to the most watched game of the year. Enjoy the day!:D

What are you waiting for? You have a crowd to feed! This recipe may be easily doubled. Enjoy!

Super Bowl... Chili

1/8 cup vegetable oil
2 large onions, chopped
4 large garlic cloves, smashed
2 green peppers
1 sweet red pepper
4 serrano (hot) peppers, diced fine (opt)
1 1/2 pounds lean ground beef
2 TBLS chili powder--more if desired (best to start small :)
1/2 tsp ground cumin
1/2 tsp oregano
sea salt & freshly ground black pepper
a few dropps of Tobasco
1 can (11 oz)low fat beef broth
2 1/2 cups chopped fresh tomatoes
3 plum tomatoes, chopped
3 cans kidney beans, rinsed well
Toppings: 1 cup shredded mozzarella cheese or low fat sour cream,

Heat oil in large pan. Add onion, garlic and peppers. Cook until vegetables are just becoming soft. Add ground beef, stirring to keep texture loose. Cook only until meat begins to lose it's pink color. Pour off all excess fat. Stir in chili powder, cooking over low heat 5 minutes. Add remaining ingredients, except mozzarella or sour cream, stirring to blend. Cover and simmer 2-3 hours. That's it! Top with generous amounts of grated mozzarella cheese or a dollop of sour cream and diced scallions. Fabulous with bread sticks, or nacho chips.

Thursday, January 29, 2009

The great Reuben debate..

Okay, I was feeling very lazy yesterday after shoveling all this snow, so decided on just a soup and sandwich supper. I wanted to have the kitchen cleared in time to catch Top Chef! But yes, I was tuckered.

An ongoing back and forth goes on here everytime I make my version of a hot Reuben sandwich. Dear hubby prefers the traditional version, corned beef, swiss, sauerkraut, mustard etc on rye. He prefers ungrilled, myself.. grilled. But I don't care for sauerkraut, nor did I have any rye bread on hand..so when he asked 'what's for dinner', I answered.. Rachel's and veggie soup. I always get a rise out of him when I come up with these new sandwich brainstorms!Where I came up with the name Rachel I'm still wondering about! :D

I was really pleased with the results, had an easy cleanup, and got to watch my fave show in time! And.. hubby had two of them, so they couldn't have been too bad. So my question is.. how do you make your reuben sandwiches? Here's my newest version.


I heated some nice lean pastrami, topped with swiss cheese, cole slaw, Russian salad dressing and a dollop of hot mustard. I grilled them in some dark pumperknickle..and a side of a few kosher dill pickles for good measure. I'm calling it a "Rachel'. Yum!

Monday, January 26, 2009

Kneading some warmth on a chilly day?


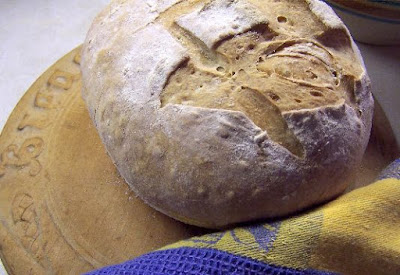
Boy! It was a chilly weekend! Bitter winds again kept me from my morning walk, but I managed to keep busy. At the suggestion of fellow blogger Karen of Karen Cooks, and many other blogs praising this bread book, I just had to pick up a copy of Artisan Bread in Five Minutes a Day.


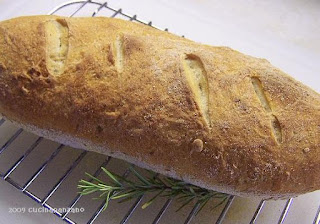
I'm so impressed with the ease of this recipe and that you can make a full batch up --stored in the refrigerator--and still have two weeks to use it up! I seldom set the time aside to make breads..but I love to eat them :D I altered my recipe just a bit with the addition of a half cup of wheat flour and so very pleased with the results. The crust is exactly the way I like it--crisp but easily torn and perfect for dipping into a pot of Sunday sauce! And toasted this morning with rosehip jam will never be the same! Yum!


If you're a first time breadmaker pick up this wonderful book. Making your first bread will keep you warm on these chilly days, I promise :D My second loaf is in the oven right now.. rosemary, garlic and sage.. more yum! Thanks for this great suggestion Karen :)


Master Bread Recipe from Artisan Bread in Five Minutes

Makes 4 -1 pound Loaves
Printed With Permission


3 Cups Lukewarm Water

1 1/2 Tablespoons Granulated Yeast (1 1/2 Packages)

1 1/2 Tablespoons Kosher Salt

6 1/2 Cups Unsifted, Unbleached, All-purpose White Flour **** this is where I sub in the ½ cup wheat flour of this total 6 ½ cups white flour called for.


Warm the water slightly. It should feel just a little warmer than body temperature, about 100 degrees F. Add the yeast and salt to the water in a 5 quart bowl, or preferably, in a re-sealable, lidded plastic food container. Mix in the flour, no kneading necessary. Add all of the flour at once, mixing with a wooden spoon, a high capacity food processor, or heavy duty stand mixer until the mixture is uniform, or until everything is uniformly moist, without dry patches.

Cover the container with a lid (not airtight), and allow the mixture to rise at room temperature until it collapses, about 2 hours. You can use a portion of the dough to make bread at any time after this step. Since refrigerated dough is less sticky to shape, it is best to refrigerate the dough overnight (or at least 3 hours) before you try making the bread for the first time. Refrigerate the unused dough in your lidded container for up to two weeks.

On baking day, first prepare a baking peel by sprinkling it with cornmeal to prevent sticking. Sprinkle your refrigerated dough with flour and pull off a 1 pound chunk. Add a little more flour, and pull the dough on all sides around to the bottom creating a ball. This step should not take longer than 30 to 60 seconds.

Allow the dough to rise on the pizza peel for about 40 minutes. It does not need to be covered at this point. It may not rise much before baking, so do not be concerned. Twenty minutes before baking, preheat the oven to 450 degrees F. with a baking stone on the center rack. Place an empty container to hold water on the rack below the pizza stone.

Dust the top of the bread with a little more flour, and slash a 1/4 inch deep cross, or tic-tac toe pattern into the top using a serrated bread knife. Slip the bread from the pizza peel onto the hot pizza stone. Pour in about a cup of hot water into the container below the stone and close the oven door to trap the steam. Bake the bread for about 30 minutes or until the crust is nicely browned and firm to the touch. Allow the bread to cool completely on a wire rack before slicing.


Then see if you can resist slicing off that first warm piece with a pad of homemade butter.. irresistable!

Wednesday, January 21, 2009

Nutella joy.. Chocolate Hazelnut Quesadilla


I'm almost embaressed to say it out loud, but I have a Nutella addiction. How many other Nutella lovers are out there? Can we have a show of hands! I just love it--on toast, breadsticks, cream puff topping, in my hot chocolate -- heck, give me a jar of this scrumptious hazelnut spread and a spoon and I am in heaven.

Oddly enough, I really love quesadillas equally as much, so I decided to play around the other day and came up with the best of both worlds. I'm calling them Chocolate Hazelnut Quesadillas. You can call them anything you like, but I'd call these downright delicious!


I had on hand a box of Dr.Oetker instant chocolate Mousse Supreme. A quick and yummy , 5 minute fix for when you get that hankering for chocolate, or want to make an easy chocolate torte. Now having a good sized addiction since I made chocolate pizzelles over the holidays and really liked the combination cinnamon and chocolate flavor, I decided to add some cinnamon to my mousse. Not much, just a few shakes.

Try not to poke your finger in the bowl while mixing this scrumptious combo or there won't be any left for filling. :) Mix up some cinnamon and sugar and set it aside. Sprinkle a few drops of olive oil in a skillet and run both sides of the tortilla around in the oil until just lightly coated. Sprinkle cinnamon sugar onto tortilla. Turn on the heat to medium. When the tortilla is just beginning to bubble and brown, give it a flip, sprinkling more cinnamon sugar on the cooked side. Only a few moments on the second side and it's done. Allow this to cool down for 5 minutes and as it does, make the mousse.

Once my tortilla's were readied I put a good dollop of Nutella on them and spread it about (making certain I licked the spoon afterward)--I then toppped the Nutella with the chocolate cinnamon mousse and folded them over. Viola! Another Nutella joy!

Tuesday, January 20, 2009

Vegetable Risotto


By now you probably know how much I love risotto. For this one, I used what I had on hand. A few mushrooms, some fresh zucchini and asparagus along with some frozen peas I had tucked away in the freezer just itching to be used up. As most of you I am sure, I've been glued to the television set all day and wanted to keep dinner simpler on this historical Inaugural day. Grilled pork chops, risotto, homemade applesauce, a garden salad and dinner was served. And for dessert.. spumoni with claret sauce..gotta have dessert!

5-6 cups chicken broth
1/4 cup unsalted butter
1 medium shallot, diced fine
2 cups Arborio rice
3/4 cup dry white wine
1 cup fresh asparagus tips
1/2 cup finely chopped zucchini
3/4 cup thinly sliced mushrooms
3/4 cup frozen peas
2 TBLS chopped fresh flat leaf parsley
2 TBLS fresh basil
1/2 cup freshly grated parmesan cheese
sea salt & ground pepper to taste


Heat broth in a medium saucepan and keep it warm. Melt butt in a larger saucepan. Once butter begins to foam, add shallots. Heat until soft. Add rice and mix well. When rice is coated with butter, add wine. Cook on medium heat until wine has evaporated. Stir in 2 ladles of chicken broth, or enough to cover the rice. Stir until broth has been absorbed. Continue cooking and stirring rice, adding broth a little at a time, about 10 minutes. Add asparagus tips, zucchini, mushrooms and peas. Cook about 10 minutes longer until rice is done. The rice should be tender but firm to the bite. Remove pan from heat. Add basil, parsley, 2/3rds of cheese and 1 TBLS butter. Mix it all well. Season with sea salt & fresh ground pepper. Sprinkle remaining cheese on top if desired and serve.
You might also like to try wild mushroom risotto, lemon saffron risotto, or my lobster risotto. Yes, I'm really hooked on risotto's! Enjoy!

Thursday, January 15, 2009

Cheesecake to go ape over!

Looking for a way to use up those old bananas? Cheesecake is always an indulgence, but the clean flavor helps cut the richness of this luscious cake. Here’s a favorite of mine that you’ll just go ape over! The flavor of the bananas is subtle but pervasive. If you want a more pronounced banana taste, you’ll with have to monkey around with it a bit on your own, but we think it’s perfect as is. What’s not to love!


Crumb crust:

2 cups graham cracker crumbs
¼ cup sugar
6 TBLS butter, melted


Preheat oven to 350 degrees.
Place the crumbs, butter and sugar in a mixing bowl and blend well.
Press the crumb mixture onto the bottom and partly up the sides of a 9 inch springform pan. Smooth the crumb mixture with back of a spoon to an even thickness and bake in 350 degree oven for 10 minutes. Cool thoroughly before filling.

Cheesecake filling:

1 pound cream cheese, room temp
¼ cup sugar
2 tsp lemon juice
4 eggs
1 cup sour cream
1 cup mashed bananas (approx 3-4, over ripened, even better)

Topping:

2 cup sour cream
½ cup sugar

1.In a mixing bowl beat together the softened cream cheese, sugar and lemon juice. Add the eggs, one at a time and beat well after each addition.

2.Stir in the sour cream and mashed bananas and blend well.

3.Pour the cheese mixture into the prepared and cooled crust and bake for 45 minutes. Cool down in oven with door ajar for 10 minutes.

4.Remove from oven and spread topping evenly over cake. Return to oven for 15 minutes more. Remove from oven, allow cake to cool and then refrigerate right in springform pan. Putting an inverted dinner plate over the top to set and will keep odors out while in refrigerator. Refrigerate for at least 8 hours before serving and then watch it disappear. Enjoy!

Sunday, January 11, 2009

Bean Soup


Meg O'Malley's is a favorite little Irish pub of mine in Melbourne, Fla where they serve the best little bowl of bean soup, the same recipe served in Irish Parliament for 18 cents. They continue to sell this delicious soup for that same price today..plus tax of course! Not surprisingly, their well known recipe is closely guarded and that's okay. It just gives me something else to look forward to in addition to warmth and sunshine when I head south for winter vacation.
On a cold day like today comfort food can warm the heart and constitution.It can draw us to warmer climates without stepping out into the winters cold and help keep our spirits full..almost a mid-winters lift. I'm reminded of warmer climate and Meg O'Malley's everytime I make my bean soup. Today is clearly one of those days.
Use any dried beans you prefer. I like to mix them up for meaty texture and color. Of course dried beans do take longer to cook, but I think they are well worth it.
Choose your beans.. rinse them well and place into a soup pot. Cover the beans with cold cold water and let them sit overnite. Soaking your beans reduces the cooking time and helps to break down the indigestible gasiness. After they have soaked, drain them and rinse again well under cold water. Now you are good to go! Begin your soup.


Cooking dried beans:

Dried beans of choice
1 shallot, sliced
2 bay leaves
fresh thyme
garlic cloves
olive oil
salt


Into a large soup pan put your cleanly soaked beans. Cover with water and slowly bring them to a boil over medium heat. If any foam arises from the boiling process, simply skim it off and discard. Reduce heat, cover and simmer until the beans are tender. The addition of a bit of flavor really adds to the finished pot, so I like to put in a few sprigs of fresh thyme, a couple of garlic cloves, a couple of bay leaves, a medium shallot,sliced, a pinch of salt and a drizzle of olive oil. Once the beans are just tender, strain, reserving a bit of your liquid and discard bay leaves. Now you can proceeed, or store your cooked beans in the refrigerator up to 3 days. Try my recipe below or make your own.. beans are so versatile and may be added to many humble dishes.. from vegan to a thick and spicy stew. Use your imagination!

Making Bean Soup:

4 garlic cloves, smashed
1 medium onion or shallot, minced
2 oz unsalted butter
drizzle of olive oil
2 carrots, grated & finely chopped (I mix them up)
3 celery stalks, chopped
4 cups low fat chicken stock
1 whole medium potato, peeled
2 smoked ham hocks
a few fresh thyme sprigs
1 bay leaf
ground pepper


Now in a clean stockpot melt butter & olive oil..adding garlic cloves, onion. Slowly cook until onions are transparent. Don't allow the garlic to brown. Add carrots, celery and cook for five minutes more. Add in the stock, ham hocks, beans, fresh thyme, bay leaf and simmer gently now for 30-40 minutes or until veggies are tender. Discard the ham hocks and ladle out 2-3 cups of soup and the potato and allow to cool a bit.Once cooled puree it in your food processor and puree. Stir the puree back into your soup pot, stir, season and serve. You'll be reward by slowly cooking this dish with a fabulously flavored and comforting soup especially on chilly days like this. Season with ground pepper and minimal salt.. the ham hocks flavor this soup more than enough. Enjoy!

Sunday, January 4, 2009

Squash Florentine

Our good friends Doris & Jack love spinach and spaghetti squash, and as I had both on hand decided to try this with them in mind.


1 spaghetti squash, roasted
olive oil- just a drizzle
1 medium shallot, minced
4 garlic cloves, smashed
2 lbs fresh spinach
8 oz ricotta cheese
2 eggs, beaten
sea salt, pepper, parsley, thyme, oregano
marinara sauce
½ cup mozzarella, shredded

Preheat oven 375°

Wash squash, cut in half lengthwise. Remove seeds and set aside. Drizzle with olive oil and seasoning. Place squash cut side down on baking sheet. Rinse the removed seeds in cold water and lightly sprinkle with salt. Place the squash seeds onto baking sheet alongside squash. You will be roasting the seeds right along with the squash.. it makes no sense to me tossing them out, when they are so delicious to eat J Now into the oven for 35 minutes or until squash is tender.

As squash is roasting, sautee until just wilted fresh spinach, garlic cloves, shallots in a bit of olive oil. Set aside until cooled. Once cooled, combine spinach, ricotta cheese, eggs and seasonings. Beat with mixer until blended well.

The squash should be roasted by now. Remove from oven and using a fork, remove spaghetti like strands and discard the shells. Set the roasted seeds aside and grab a few to munch on while assembling the dish.

Place squash strands in a baking dish coated with cooking spray. Spread spinach/ricotta mixture over squash layer. Top with marina sauce and shredded mozzarella cheese. Cover and bake for 30 minutes. Enjoy!

Thursday, January 1, 2009

Is there a correct way to eat an Eclair

Some friends and I were just discussing this the other day. Are you one of those that starts with the filling or one that slowly licks the chocolate sauce on top first? Have a favorite filling? Can you stop with just one?! I know my new friend Chef Chuck says ‘one is just not enough’.You’ll get no argument from me :)

I’ve been wanting to make these for some weeks now, so after reading Chucks post here, and since it’s been years since I have made them (and for lack of locating/unpacking my fave recipes) I gave his pastry recipe a whirl. Excellent choice! They are light and yet still slightly butter flavored and browned up beautifully. The biggest problem I had was piping them onto my cookie sheet and filling. (Yes, my piping bags and tips are also still missing.. ugh!) But I’m certain the Ziplock Storeage Bag Co just knew there would be millions of cooks across America with this same dilemma when they designed their handy little bags.


I used my regular custard filling for the éclairs and whipped cream for the puffs. And as I had some of my delicious chocolate glaze leftover for ice cream stashed, I used this.

Pastry Cream
This is a basic all purpose pastry cream that can be used for a variety of desserts: éclairs, cream puffs, Napoleans, fruit tarts, even layered cakes. And you may use any flavorings such as vanilla, almond or anise extracts to taste.

2 cups milk
2 eggs – room temp
¾ cup sugar
½ cup all purpose flour
1 tsp flavoring – or omit.. it’s yummy enough without

Bring milk to scalding stage in a pan or double boiler (Do not allow it to boil.) Beat the sugar, eggs and flour together with a whisk and pour into the scalded milk. Lower the heat and with a wooden spoon, stir continuously until the pudding has thickened. Remove from heat and add your flavoring. Once your pastry has cooled, fill with pudding and dip or drizzle glaze/frosting topping.


As it’s New Years Day, why don’t you try your hand at making some of these. You won’t be sorry, and if you have a houseful of football fans today, best to make extras.. they are that good! You can be lazy like I am sometimes and use boxed pudding mix for your filling, but only use ¾ liquid called for to thicken it. A quickie chocolate sauce can be made with 1 cup chocolate chips and 1 teaspoon of vegetable oil, warmed until the chips melt. Keep them refrigerated before you serve, and then watch them disappear! Enjoy!